Diffusers - generate images with unconditional model
In recent years, diffusion models have emerged as a powerful tool in the domain of generative modeling, often rivaling GANs (Generative Adversarial Networks) in producing high-quality images (have a look at this paper from 2021 and stable diffusion from 2022). These models operate by simulating a diffusion process where data is progressively noised and then denoised to generate new samples.
New courses appear to explain how such method function. One of them is How Diffusion Models Works from DeepLearning.ai. It provides great notebooks to create our first diffusion model/pipeline. But, it is tedious to implement such an approach from scratch using only the PyTorch library (but a great way to learn the way such a method works).
In this blog post, we will delve into the implementation of an Unconditional UNet using the Diffusers library from deeplearning.ai. We will walk through the key components of the code, explain how the diffusion process is modeled with the Diffusers library. All the code (as notebook) and trained weights can be found there.
Note: This post will not explain how diffusion models works, but how to use diffusers library to simplify our life.
Why the diffusers library?
This library is backed by Hugging Face and offers a robust and flexible framework for working with diffusion models. Here are the main reasons why you should consider using Diffusers for your projects:
- Ease of use with high-level API to design UNET models.
- Comprehensive documentation even if tutorials and examples are not covering all cases.
- Active community and support, with more than 23k stars on their GitHub repository.
Define the unet model and a noise scheduler
Before training a model, we need to define it and to define the associated noise scheduler:
from diffusers import DDPMScheduler
from diffusers.models import UNet2DModel

# Define the UNet model
# Note: this model use less parameters compared to deeplearning.ai course as it is not necessary to have such huge model for this task
model = UNet2DModel(
    sample_size=(16,16),                              # Input image size
    in_channels=3,                                    # Number of input channels (e.g., 3 for RGB)
    out_channels=3,                                   # Number of output channels
    layers_per_block=2,                               # Layers per block in the UNet
    block_out_channels=(128, 64),                     # Channels in each block
    down_block_types=("DownBlock2D", "DownBlock2D"),  # Types of down blocks
    up_block_types=("UpBlock2D", "UpBlock2D")         # Types of up blocks
)

# Define the DDPM scheduler
noise_scheduler = DDPMScheduler(num_train_timesteps=500)
And that is it! The UNet2DModel can save us a huge amount of time defining such a model.
Train the model
Here I made a simple train function including the basics to not overwhelm readers 😉:
def train(unet: UNet2DModel, noise_scheduler: DDPMScheduler, dataloader: DataLoader, num_epochs: int, lr: float) -> None:
    """Train the unet given its noise_scheduler and a dataloader.

    Parameters
    ----------
    unet : UNet2DModel
        The model unet to train.
    noise_scheduler : DDPMScheduler
        noise scheduler to use while training.
    dataloader : DataLoader
        The dataloader containing the images to reproduce.
    num_epochs : int
        The number of epochs to train the unet.
    lr : float
        The learning rate to use to train the unet.
    """
    epochs = range(num_epochs)
    losses = np.zeros(num_epochs)

    optimizer = Adam(unet.parameters(), lr=lr)
    unet.train()

    for epoch in epochs:
        epoch_loss = 0
        for batch in tqdm(dataloader):
            optimizer.zero_grad()

            # Assuming your dataloader provides images and targets (not used here)
            images, _ = batch
            images = images.to(unet.device)

            # Generate random noise
            noise = torch.randn(images.shape).to(unet.device)

            # Forward pass through the model
            timesteps = torch.randint(0, noise_scheduler.config.num_train_timesteps, (images.shape[0],), device=unet.device).long()
            noisy_images = noise_scheduler.add_noise(images, noise, timesteps)
            predicted_noise = unet(noisy_images, timesteps).sample

            # Compute loss (mean squared error between actual and predicted noise)
            loss = torch.nn.functional.mse_loss(predicted_noise, noise)

            # Backward pass and optimization
            loss.backward()
            optimizer.step()
            epoch_loss += loss.item()

        epoch_loss /= len(dataloader)
        losses[epoch] = epoch_loss
        print(f"Epoch {epoch + 1}/{num_epochs}, Loss: {epoch_loss}")
It prints the mean loss of each epoch. To train the model, we forward the model on random timesteps on data from a dataloader. Then, we compute the loss on the predicted noise to optimize the parameters of our model. In the notebook we used the dataloader from deeplearning.ai so nothing new under the sun 😛. As you can see, Diffusers library is not magical and require we implement some stuff ourselves.
To save our pretrained model, a single line is required:
model.save_pretrained(pre_trained_model_path)
Do inferences with the trained model
Now we learned our model, we can load it and use it on a pipeline from the diffusers library. First, let’s load our model parameters:
model = UNet2DModel.from_pretrained(pre_trained_model)
Pretty easy! Now let’s declare our pipeline and use cuda if available:
from diffusers import DDPMPipeline

pipeline = DDPMPipeline(unet=model, scheduler=noise_scheduler)
pipeline.to("cuda" if torch.cuda.is_available() else "cpu")
And that’s all, now generate new images is as simple as:
generated_image = pipeline(batch_size=16, num_inference_steps=500)
I made a simple tool to show the generated images (you can take a look at the GitHub repository for more information). So let’s visualize the result:
fig = plot_generated_images(generated_image.images, 4, 4)
fig.show()
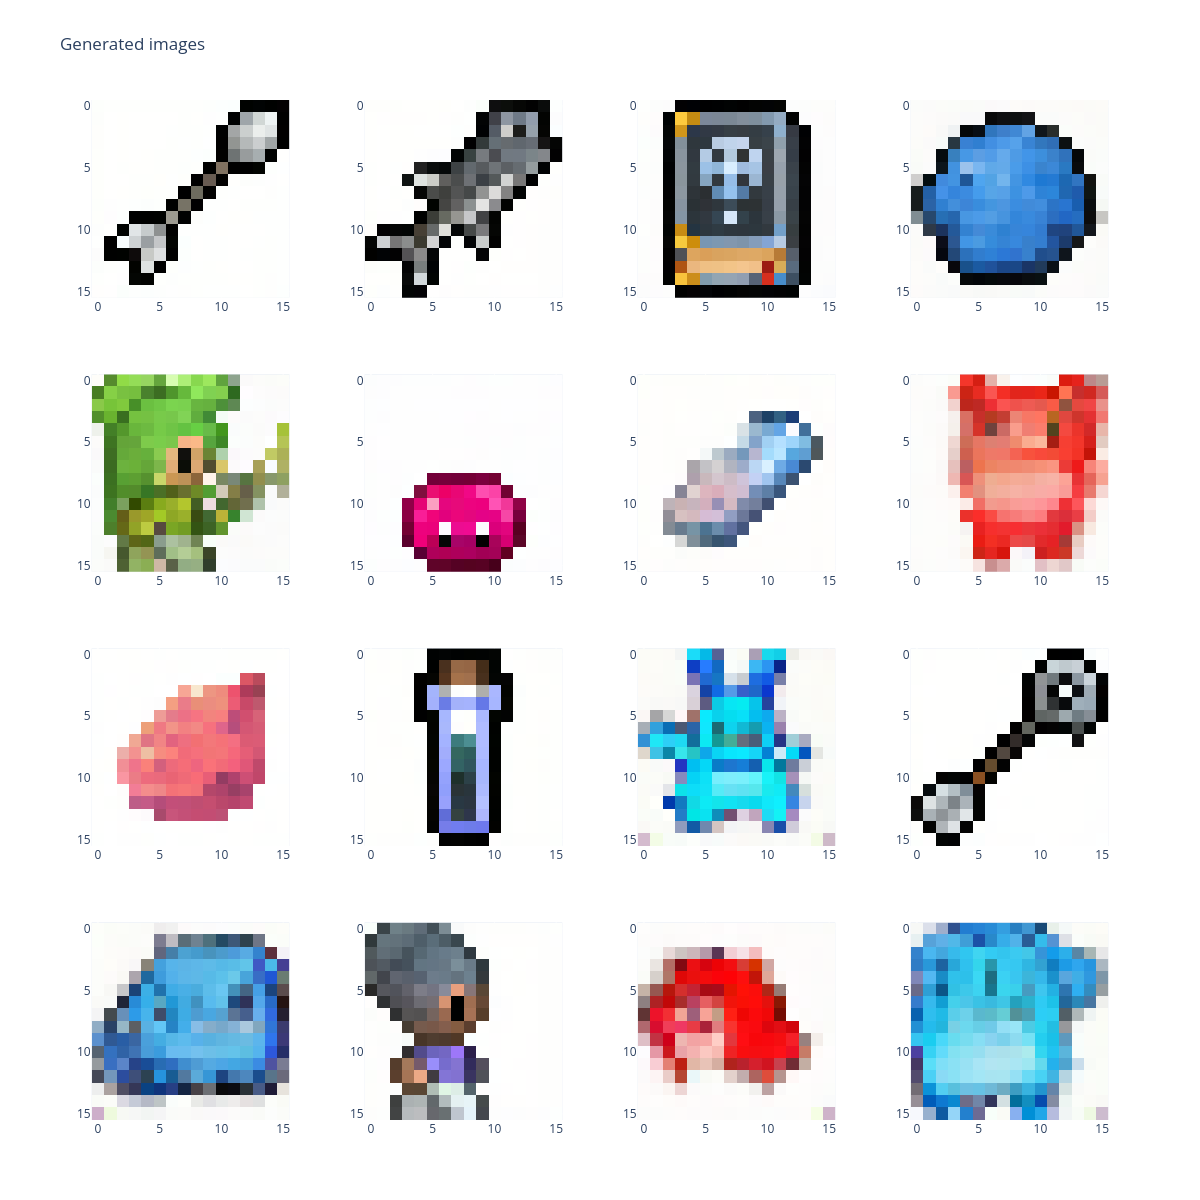
Here we go, we have generated our first examples using the diffusers library. In the next blog post, we will see how to generate examples given one-hot ground truth (instead of tutorials using only text and to follow the deeplearning ai course).
I hope this helps and/or inspires some of you.
See you again, Vincent.